A Technology Blog About Code Development, Architecture, Operating System, Hardware, Tips and Tutorials for Developers.

Saturday, December 25, 2010

GARBAGE COLLECTION IN JAVA - GENERATIONS

11:31:00 AM Posted by Satish , , , , 1 comment
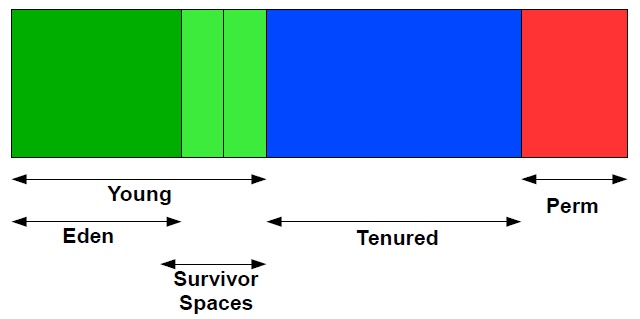
At initialization, a maximum address space is virtually reserved but not allocated to physical memory unless it is needed. The complete address space reserved for object memory can be divided into the young and tenured generations.

The young generation consists of eden plus two survivor spaces. Objects are initially allocated in eden. One survivor space is empty at any time, and serves as a destination of the next, copying collection of any live objects in eden and the other survivor space. Objects are copied between survivor spaces in this way until they are old enough to be tenured, or copied to the tenured generation.
Other virtual machines, including the production virtual machine for the J2SE Platform version 1.2 for the Solaris Operating System, used two equally sized spaces for copying rather than one large eden plus two small spaces. This means the options for sizing the young generation are not directly comparable.


A third generation closely related to the tenured generation is the permanent generation. The permanent generation is special because it holds data needed by the virtual machine to describe objects that do not have an equivalence at the Java language level. For example objects describing classes and methods are stored in the permanent generation.

Sunday, December 19, 2010

JSESSIONID & APACHE STICKY SESSION

3:45:00 PM Posted by Satish , , , 1 comment
Recently I and my team implemented the sticky session feature from apache to our application. After that we started getting frequent session time out issue from testing team. After a long analysis we found, the browser is not flushing the JSESSIONID each time the new session get created from the server. So if the cached session is of node 1 and new session is get created from node 2 the user used to get the session time out problem as apache used to redirect the request to node 1, where there is no session available.We found out this after analyzing the request header and server logs.

So we came up with a solution to flush the JSESSIONID each time the user comes to login page. Bellow is the java script code for the same.


<script>
setCookiesecure("JSESSIONID", getCookie("JSESSIONID"), -1, "/", null, true);
</script>


function setCookiesecure (name,value,expires,path,domain,secure) {

document.cookie = name + "=" + value + ((expires) ? "; expires=" + expires : "") + ((path) ? ";path=" +      path : "") + ((domain) ? "; domain=" +domain :"") + ((secure) ? "; secure" : "");
}


function getCookie( name )
{
        var start = document.cookie.indexOf( name + "=" );
        var len = start + name.length + 1;
        if ( ( !start ) && ( name != document.cookie.substring(0, name.length ) ) ) { 
        return null; 
        }

        if ( start == -1 ) return null;

        var end = document.cookie.indexOf( ";", len ); 
        if ( end == -1 ) end = document.cookie.length;
        return unescape( document.cookie.substring( len, end ) );
}


RESOURCE CACHING FROM APACHE

3:17:00 PM Posted by Satish , , , , No comments
1. Uncomment the following lines from the "$apache_home/conf/httpd.conf".

LoadModule expires_module modules/mod_expires.so
LoadModule headers_module modules/mod_headers.so
LoadModule deflate_module modules/mod_deflate.so

2. Add the following lines to "$apache_home/conf/mod-jk.conf" at the last.
#cache settings

ExpiresActive On

    Options FollowSymLinks MultiViews
    AllowOverride All
    Order allow,deny
    Allow from all
    ExpiresDefault A25920003

Now you can check the request header, the resources can be in browser's cache for 30 days.

STATIC RESOURCE APACHE PROXY

2:46:00 PM Posted by Satish , , , , , No comments

1. Dump your application static resources i.e images, css, html, javascript to "$apache_home\htdocs\".

2. Add the following lines to the "$apache_home/conf/mod-jk.conf" bellow "# Let Apache serve the images"

JkUnMount /__application__/css/* node1
JkUnMount /__application__/images/* node1
JkUnMount /__application__/xmlhttp/* node1
JkUnMount /__application__/js/* node1

Note: In case of multiple nodes, the load balancer name in place of node1.

3. Add the following lines to the "$apache_home/conf/uriworkermap.properties"  at the last.

!/*/css/*=*
!/*/images/*=*
!/*/xmlhttp/*=*
!/*/js/*=*

4. Now remove the static resources from your war/ ear.

APACHE SETUP FOR JBOSS

2:36:00 PM Posted by Satish , , , , No comments
1. Download Apache HTTP 2.2 from here(http://olex.openlogic.com/package_versions/download/9478?package_version_id=5577&path=openlogic%2Fapache%2F2.2.17%2Fopenlogic-apache-2.2.17-windows-ins-no-ssl-1.zip)


2. Unzip the file and double click on the installation file. Next follow the screen instructions to install.

3. After installation click the test configuration to test if Apache is working or not.

4. Now start the apache by clicking start from Apache sub menu.

5. Request for http://localhost/ to check the status.

6. Now time to confirure the proxy set up for Jboss. To do so we are going to use the the mod jk module in apache http.

7. Download themod_jk-1.2.31-httpd-2.2.3.s from here(http://www.apache.org/dist/tomcat/tomcat-connectors/jk/binaries/win32/jk-1.2.31/mod_jk-1.2.31-httpd-2.2.3.so).

8. Rename the file to mod_jk.so and put to the "$apache_home/modules/" folder.

9. Now open the "$apache_home/conf/httpd.conf" and add the following lines at the end.

<IfModule !mod_jk.c>
  LoadModule jk_module modules/mod_jk.so
</IfModule>

#Include mod_jk configuration file
Include "C:/Program Files/Apache Software Foundation/Apache2.2/conf/mod-jk.conf"

Note: change the path acording to your environment.

10. Create a file "$apache_home/conf/mod-jk.conf" and add the following content to that.

# Load mod_jk module
# Specify the filename of the mod_jk lib
#LoadModule jk_module modules/mod_jk.so

# Where to find workers.properties
#JkWorkersFile conf/workers.properties
JkWorkersFile conf/workers.properties


# Where to put jk logs
#JkLogFile logs/mod_jk.log
JkLogFile logs/mod_jk.log

# Set the jk log level [debug/error/info]
JkLogLevel info

# Select the log format
JkLogStampFormat "[%a %b %d %H:%M:%S %Y]"

# JkOptions indicates to send SSK KEY SIZE
# Notes:
# 1) Changed from +ForwardURICompat.
# 2) For mod_rewrite compatibility, use +ForwardURIProxy (default since 1.2.24)
# See http://tomcat.apache.org/security-jk.html
JkOptions +ForwardKeySize +ForwardURICompatUnparsed -ForwardDirectories

# JkRequestLogFormat
JkRequestLogFormat "%w %V %T"

# Mount your applications
JkMount /__application__/* node1

# Let Apache serve the images
#JkUnMount /__application__/images/* node1


# You can use external file for mount points.
# It will be checked for updates each 60 seconds.
# The format of the file is: /url=worker
# /examples/*=ajp13
JkMountFile  conf/uriworkermap.properties

# Add shared memory.
# This directive is present with 1.2.10 and
# later versions of mod_jk, and is needed for
# for load balancing to work properly
# Note: Replaced JkShmFile logs/jk.shm due to SELinux issues. Refer to
# https://bugzilla.redhat.com/bugzilla/show_bug.cgi?id=225452
JkShmFile run/jk.shm

# Add jkstatus for managing runtime data
<Location /jkstatus>
JkMount status
Order deny,allow
Deny from all
Allow from 127.0.0.1
</Location>

11. Now create "$apache_home/conf/workers.property" and add the following lines to that.

# Define list of workers that will be used
# For mapping requests
worker.list=node1,status


# Define Node1
worker.node1.port=8009
worker.node1.host=10.5.1.26
worker.node1.type=ajp13
#ping_mode as of mod_jk
worker.node1.ping_mode=A
#worker.node1.socket_timeout=10
        
# Status worker for managing load balancer
worker.status.type=status
#worker.localhost.host=10.5.1.26

Note: Change the host IP according to your IP. This configuration has been done for only one node. So there is no load balancer. You can add more than two nodes and a load balancer to manage. You can also enable sticky session if Jboss clustering and session replication is not enabled. 

12. Now create "$apache_home/conf/uriworkermap.properties" and add the following lines to that.

# Mount the Servlet context to the ajp13 worker
/jmx-console=node1
/jmx-console/*=node1
/web-console=node1
/web-console/*=node1
/test=node1
/test/*=node1

13. Now Jboss has to be configured to work with Apache.

A) Open "$jboss_Home/server//deploy/jboss.web-deployer/server.xml"

search for the following line and specify jvmRoot attribute to node1 as bellow.
Engine name = ”jboss.web” default host = “hostname” jvmRoute = “node1”

B)  Open "$jboss_Home/server/<instance_name>/deploy/jboss.web-deployer/meta-INF/jboss-service.xml"

search for "useJK" and make the value to "true" as bellow.
<attributename = “UseJK” > true</attribute>

14. Now restart the both web and app server. To test access test from web server DNS ie http://localhost/test.
Saturday, November 6, 2010

GPS with JGPS - Setup Testing

3:12:00 PM Posted by Satish , , No comments
I am playing around the GPS module since quite some time and got a new JGPS java api to interact with. I have a serial out put GPS module. Check out my GPS setup. This particular API has got a very good interface for USB, Serial and bluetooth GPS devides.This has native API for both Unix and windows platform. In unix plat form this supports both linux and solaris. This API has got a very meaning full instruction to setup in unix environment. As I have my java comm API already setup to windows and I have the USB - Serial driver for windows, I tested in windows rather than ubuntu.

This api works on the top of java comm api. I was controlling my GSM/ GPRS modem through  the IO channels using java comm api. In the older versions of jGPS, the io interaction to the GPS module was through Java comm api and the jGPS was only the formatter. But this new release integrated the Java comm api with it again with some additional interface like bluetooth.

So general architecture is as follows.

GPS Module - Serial/ USB/ Bluetooth Interface - Java Comm API (JAVA+Native API[OS specific]) - jGPS API (JAVA)

Following is a simple program to register to one of the event and get notified for the lat/lng.

Source


package org.satish.practice;


import com.uf.gps.Descriptor;
import com.uf.gps.GPSListener; 
import com.uf.gps.GPSEvent; 
import com.uf.gps.Position;
import com.uf.gps.protocols.NMEA.NMEAHandler; 
import com.uf.gps.Connection; 
import com.uf.gps.ConnectException; 
import javax.comm.SerialPort;

public class myApp implements GPSListener { 
public myApp () { 

NMEAHandler nh = null; 
/* Initialize a connection handler on the RS232 interface */ 
try { 
nh = new NMEAHandler(1,"myApp","COM6",9600, SerialPort.DATABITS_8, SerialPort.STOPBITS_1, SerialPort.PARITY_NONE); 
} catch (ConnectException x) { 
// Something is going wrong
} 
/* Enable reception of GPSEvents */ 
nh.registerListener( this ); 
}

public static void main(String[] args) throws ConnectException { 
myApp my = new myApp(); 
}

public void actionPerformed(GPSEvent ev) { 
Position p = null; 
/*
* public GPSEvent (Connection src, int transactiontype, int datatype, Object
* data)
*/ 
/* src: connection handler, maybe there's more than one defined */
/* transactiontype: is one of BEGIN_TRANS, END_TRANS, _TRANS */ 
/* datatype: one of the _CLASS constants, which classifies a data type */ 
/* data: the GPSObject */ 

if (ev.getTransType() == GPSEvent.POS_TRANS) { 
p = (Position) ev.getData(); 

/* Every high level class has lots of properties */
Descriptor wa = p.getProperty("LONGITUDE"); 
Descriptor wb = p.getProperty("LATITUDE"); 

/* wa.getValue of class Double */ 
String lon = wa == null ? "" : (String) wa.getValue().toString(); 

/* wb.getValue of class Double */ 
String lat = wb == null ? "" : (String) wb.getValue().toString(); System.out.println( "Latitude/Longitude = [" + lat + "][" + lon + "]" ); 
} else if (ev.getTransType() == GPSEvent.WPT_TRANS) { 
// .................................................. 
}
}
}


Output

Latitude/Longitude = [12.957963999999999][77.67056266666667]

Latitude/Longitude = [12.957963999999999][77.67056266666667]
Latitude/Longitude = [12.957967][77.67056366666667]
Latitude/Longitude = [12.957972][77.67056166666667]
Latitude/Longitude = [12.95797][77.67056366666667]
Latitude/Longitude = [12.957965][77.67056366666667]
Latitude/Longitude = [12.957963][77.67056366666667]
Latitude/Longitude = [12.957961999999998][77.67056466666668]
Latitude/Longitude = [12.95796][77.67056666666667]
Latitude/Longitude = [12.957958999999999][77.67056866666667]
Latitude/Longitude = [12.957958999999999][77.67056966666667]
Latitude/Longitude = [12.957961999999998][77.67057066666668]
Latitude/Longitude = [12.957958999999999][77.67057266666667]


I will still be playing around the API and keep posting too.

Thursday, October 28, 2010

NMEA GPS Reads

8:58:00 PM Posted by Satish , , No comments
GPS modules typically put out a series of standard strings of information, under something called the National Marine Electronics Association (NMEA) protocol. More information on NMEA standard data strings can be found at this site.
GPS receiver gives the reading starting with the following strings and each string appended data has its own significant.
  • $GPGGA: Global Positioning System Fix Data
  • $GPGSV: GPS satellites in view
  • $GPGSA: GPS DOP and active satellites
  • $GPRMC: Recommended minimum specific GPS/Transit data
Each of these sentences contains a wealth of data. For example, here are a few instances of the $GPRMC string.
eg1. $GPRMC,081836,A,3751.65,S,14507.36,E,000.0,360.0,130998,011.3,E*62 eg2. $GPRMC,225446,A,4916.45,N,12311.12,W,000.5,054.7,191194,020.3,E*68
225446 Time of fix 22:54:46 UTC A Navigation receiver warning A = Valid position, V = Warning 4916.45,N Latitude 49 deg. 16.45 min. North 12311.12,W Longitude 123 deg. 11.12 min. West 000.5 Speed over ground, Knots 054.7 Course Made Good, degrees true 191194 UTC Date of fix, 19 November 1994 020.3,E Magnetic variation, 20.3 deg. East *68 mandatory checksum
eg3. $GPRMC,220516,A,5133.82,N,00042.24,W,173.8,231.8,130694,004.2,W*70
1 2 3 4 5 6 7 8 9 10 11 12
 
1 220516 Time Stamp 2 A validity - A-ok, V-invalid 3 5133.82 current Latitude 4 N North/South 5 00042.24 current Longitude 6 W East/West 7 173.8 Speed in knots 8 231.8 True course 9 130694 Date Stamp 10 004.2 Variation 11 W East/West 12 *70 checksum
eg4. for NMEA 0183 version 3.00 active the Mode indicator field is added
$GPRMC,hhmmss.ss,A,llll.ll,a,yyyyy.yy,a,x.x,x.x,ddmmyy,x.x,a,m*hh
Field #
1 = UTC time of fix 2 = Data status (A=Valid position, V=navigation receiver warning) 3 = Latitude of fix 4 = N or S of longitude 5 = Longitude of fix 6 = E or W of longitude 7 = Speed over ground in knots 8 = Track made good in degrees True 9 = UTC date of fix 10= Magnetic variation degrees (Easterly var. subtracts from true course) 11= E or W of magnetic variation 12= Mode indicator, (A=Autonomous, D=Differential, E=Estimated, N=Data not valid) 13 = Checksum
The full documentation you can get here.

Sunday, October 24, 2010

GPS Receiver Module - iW-GPS-01

6:06:00 PM Posted by Satish , , 2 comments
Got iW-GPS-01(with Active Antenna) and iWave's GPS Platforms. The GPS board is mounted on a GPS platform with serial out and has a external antenna. The board has got a serial port and a power input.The board operates on 5 - 35 V input.

Full specification attached here.

Reads I got from Hiper Terminal.

$GPGSA,A,3,14,06,24,03,30,31,21,22,,,,,2.1,1.0,1.8*3D
$GPGSV,3,1,12,31,72,201,17,22,47,056,15,24,38,314,26,14,37,004,24*72
$GPGSV,3,2,12,18,26,093,,30,26,106,24,06,17,219,25,25,16,084,19*73
$GPGSV,3,3,12,19,14,265,,21,13,150,22,03,13,232,27,16,06,191,*7C
$GPRMC,181611.000,A,1257.7947,N,07740.3910,E,0.16,57.21,231010,,,A*54
$GPVTG,57.21,T,,M,0.16,N,0.3,K,A*38
$GPGGA,181612.000,1257.7948,N,07740.3910,E,1,08,1.0,916.6,M,-88.4,M,,0000*75
$GPGSA,A,3,14,06,24,03,30,31,21,22,,,,,2.1,1.0,1.8*3D
$GPRMC,181612.000,A,1257.7948,N,07740.3910,E,0.40,131.00,231010,,,A*69
$GPVTG,131.00,T,,M,0.40,N,0.7,K,A*0D
$GPGGA,181613.000,1257.7946,N,07740.3911,E,1,08,1.0,917.4,M,-88.4,M,,0000*78
$GPGSA,A,3,14,06,24,03,30,31,21,22,,,,,2.1,1.0,1.8*3D
$GPGSV,3,1,12,31,72,201,17,22,47,056,14,24,38,314,26,14,37,004,24*73
$GPGSV,3,2,12,18,26,093,,30,26,106,24,06,17,219,25,25,16,084,19*73
$GPGSV,3,3,12,19,14,265,,21,13,150,22,03,13,232,27,16,06,191,*7C
$GPRMC,181613.000,A,1257.7946,N,07740.3911,E,0.74,149.98,231010,,,A*6E
$GPVTG,149.98,T,,M,0.74,N,1.4,K,A*06


Some pictures of my setup.


Let play around it.