A Technology Blog About Code Development, Architecture, Operating System, Hardware, Tips and Tutorials for Developers.

Showing posts with label OPEN SOURCE. Show all posts

Tuesday, February 12, 2013

OAuth2 - In a Simple Way

11:40:00 PM Posted by Satish , , , , , 5 comments
Last week I started playing with OAuth 2.0. I started with a github project called spring-security-oauth. I checked the sample OAuth 2 provider sparklr and OAuth 2 client tonr. But I could not get much from the sample example and the documentation provided. I explored a bit in the internet and finally could able to conclude some thing. I created a sample provider and checked all authorization on that. Now, I am here to explain different aspects of OAuth 2.0 from the practical point of view. I will try my best to present a modular and easy explanation here.


Many services such as Facebook, Github, and Google have already implemetated OAuth 2.0. That is why today most of the web sites using google/ facebook for authentication and authorization. They work as resource server, from where other clients fetch profile informations.

This post is an attempt to describe OAuth 2.0 in a simplified format to help developers and service providers implement the protocol.

I will be covering the following topics in this article.

1. Entities
2. Creating an Application
3. Authorization
a. Web Server Apps
b. Browser-Based Apps
c. Mobile Apps
d. Others
4. Accessing Resources
5. Resources


OAuth 2 Entities
OAuth 2 Entites


Entities:

OAuth Server:
This is also known as OAuth Provider. It's whole responsibility is to authenticate and authorize user/ client and manage the tokens. 

The Third-Party Application:
Third-Party Application popularly known as client, is going to attempt to get access to the user's account. It needs to get permission from the user, before it can do so. This could be a web server based application, browser based application, desktop application, mobile/tablet application or some smart devices like google Goggles and smart televisions. 

Resource Server:
The API popularly known as Resource Server, from where the data will be fetched out or served. This could be the SOAP or REST based service providers.

The User:
The User popularly known as Resource Owner, who gives access to access the resource.

Creating an Application:

Before you can begin the OAuth process, you must first register a new app with the service/provider. When registering a new app, you usually register basic information such as application clint id, secret, authorized-grant-types etc. In addition, you must register a redirect URI to be used for redirecting users to for web server, browser-based, or mobile apps.

Redirect URIs:
The service will only redirect users to a registered URI, which helps prevent some attacks. Any HTTP redirect URIs must be protected with SSL security, so the service will only redirect to URIs beginning with "https". This prevents tokens from being intercepted during the authorization process.

Client ID and Secret:
After registering your app, you will be having your client ID and a client secret. The client ID is considered public information, and is used to build login URLs, or included in Javascript source code on a page. The client secret must be kept confidential. If a deployed app cannot keep the secret confidential, such as Javascript or native apps, then the secret is not used.

Authorization:

The first step of OAuth 2 is to get authorization from the user. For browser-based or mobile apps, this is usually accomplished by displaying an interface provided by the service to the user.

OAuth 2 provides several grant types for different use cases. The grant types defined are:

Authorization Code for apps running on a web server
Implicit for browser-based or mobile apps
Password for logging in with a username and password
Client credentials for application access

Web Server Apps
Web apps are written in a server-side language and run on a server where the source code of the application is not available to the public.

Authorization request:

http://localhost:8080/oauth2/oauth/authorize?response_type=code&client_id=easylocate&scope=read&redirect_uri=http://localhost:8080/web

After accepting the access. the page will be redirected to the redirect uri with the authorization code.

http://localhost:8080/web/?code=t7ol7D

Now it is time to exchange the authorization code to get the access token.

http://localhost:8080/oauth2/oauth/token?grant_type=authorization_code&code=t7ol7D&redirect_uri=http://localhost:8080/web&client_id=easylocate&client_secret=secret

The OAuth server replies with the access token

1
2
3
4
5
6
7
{
  "access_token": "372c3458-4067-4b0b-8b77-7930f660d990",
  "token_type": "bearer",
  "refresh_token": "ce23c924-3f28-456c-a112-b5d02162f10c",
  "expires_in": 37364,
  "scope": "read"
}

In case of wrong authorization code, Oauth server replies error.

1
2
3
4
{
  "error": "invalid_grant",
  "error_description": "Invalid authorization code: t7olD"
}

Security: Note that the service should require apps to pre-register their redirect URIs. Or else there will be a mismatch.

Browser-Based Apps & Mobile Apps:
Browser-based apps run entirely in the browser after loading the source code from a web page. Since the entire source code is available to the browser, they cannot maintain the confidentiality of their client secret, so the secret is not used in this case.

Authorization request:

http://localhost:8080/oauth2/oauth/authorize?response_type=token&client_id=easylocate&redirect_uri=http://localhost:8080/web&scope=read

After accepting the access. the page will be redirected to the redirect uri with the token.

http://localhost:8080/web/#access_token=372c3458-4067-4b0b-8b77-7930f660d990&token_type=bearer&expires_in=37026

That's it, there's no other steps! At this point, some Javascript code can pull out the access token from the fragment (the part after the #) and begin making API requests.

If there is an error, you will instead receive an error in the URI fragment, such as:

http://localhost:8080/web/#error=invalid_scope&error_description=Invalid+scope%3A+rea&scope=read+write

Password Based:
OAuth 2 also provides a password grant type which can be used to exchange a username and password for an access token directly. Since this obviously requires the application to collect the user's password, it should only be used by apps created by the service itself. For example, the native Twitter app could use this grant type to log in on mobile or desktop apps.

To use the password grant type, simply make a POST request like the following. I am using the curl tool to demonstrate the POST request. You may use any rest client.

curl -i -X POST -d "client_id=easylocate&grant_type=password&username=admin&password=admin&client_secret=secret" http://localhost:8080/oauth2/oauth/token

The server will get back with the token

1
2
3
4
5
6
7
{
  "access_token": "4e56e9ec-2f8e-46b4-88b1-5d06847909ad",
  "token_type": "bearer",
  "refresh_token": "7e14c979-7039-49d0-9c5d-854efe7f5b38",
  "expires_in": 36133,
  "scope": "read write"
}

Client Credential Based:
Client credentals based authorization is used for server to server application access. I am just showing a POST request using the curl tool.

curl -i -X POST -d "client_id=easylocate&grant_type=client_credentials&client_secret=secret" http://localhost:8080/oauth2/oauth/token

Server will get back with the access token

1
2
3
4
5
6
{
  "access_token": "9cd23bef-ae56-46b0-82f5-b9a8f78da569",
  "token_type": "bearer",
  "expires_in": 43199,
  "scope": "read write"
}

Accessing Resources:

Once you are been authenticated and got the access token, you can provide the the access token to access the protected resources.

1
curl -i -H "Authorization: Bearer 4e56e9ec-2f8e-46b4-88b1-5d06847909ad" http://localhost:8080/oauth2/users

I have created my OAuth2 server/provider using spring oauth2 api. I will be creating deferent types of clients and services to demonstrate more. I am not that good in mobile app development, appreciate if some one fork the project and add sample mobile applications. I have shared the code at GitHub.

Resources:
Wednesday, December 19, 2012

Architecture of a Modern Web Application

Some time in my career, I was working in a RFID tracking system and I was designing the real time event notification web application for that, I was using Google Map API to show the activities on a particular facility/ floor map, where RFID sensors were mounted. I tried lot of techniques and APIs and finally, I could able to push messages to the clients.. Now the question is “how did I do that???” It was a long back and at that time there were very few APIs available, which were providing server side pushing. I took the DWR Reverse AJAX and in a layman’s way to explain, clients were subscribing for the messages for a particular criteria with the server. But  to be very honest, let’s say after some 7 - 8 hours, the browsers used to be almost inactive and user couldn't even do anything, may be because of memory. Few years back, when I started using the TweetDesk a Chrome app, I realized it uses the same technique to get the messages and it is damn good and efficient. I was always very eager to know what exactly and how they are doing that.. Today facebook.com, amazon.com are very popular and they also follow some kind of the same approach… One more thing, I noticed with firebug, that for most of the operations, there is a AJAX call and only the data is flowing in terms of JSON/ text; there is no form submit to any action.. And the biggest advantage is that they are user-friendly, interactive and kick ass fast.
Long time back, there was a standard approach for all the web applications. Most of the cases, everyone was following the MVC or MVC 2 design with a service layer and DAO layer. And those days one application means a huge and fat war or an ear. Companies were using heavy application containers like weblogic and jboss, with lot of dependency. It was like a fat ugly man needs an extremely customized environment to live his life, or else he will die in no time. After that some time back companies were moving towards the SOA. A big application was further divided in to small chunks and they were interacting with each other by messages.. SOAP based web services were very powerful technique to interact with services, but now the world is going towards RESTful web services as it is simple and easy to develop. With the SOA the applications were really simple and maintaining a low cohesion. The applications used to be light weight and the servers used to be healthy all the time. But still there was a room for improvement, why the UI elements are getting streamed from server and consuming a major band width of the network.. In order to answer this question, designers moved the MVC to front-end and back end is now only the services.. If you are a back-end developer, you will be thinking, how it is possible and may be feeling insecurity about your job.. But believe me, now it is time to adapt the so called ugly JavaScript to develop beautiful and interactive applications. As the MVC concerned with front-end, there are lot of JavaScript APIs are available. So I can now conclude something that all the modern web sites like facebook.com, amazon.com and some Chrome apps like TweetDesk are using the same concept.

I was part of the Spring One Conference India Dec, 2012 and there the things were got cleared with a talk from Jeremy Grelle. Jeremy is a Spring Source Staff Engineer and one of the open source contributor for many projects.. Next, I am going give a picture of what Jeremy presented in that conference. In this article, I will take you to “Where we’ve been”, “Where we’re going” and “How we will get there”.

Static Web Pages with HTML:

When the www started, all the pages were static and served from server. There used to be separate page for separate data. The world was with URL and links.
  • Pros:
  1. Low Computation: As they are static, there is hardly any computations from a programmer point of view.
  2. Highly Cacheable: They are very easy and perfect candidate for caching.
  3. Highly Indexable: They are easily get indexed by leading search engines for their static data content.
  • Cons:
  1. Hard to Update: If you need to change anything, you have to go to the HTML file and change that  and a developer is required for the same.. Bad dependency; Isn’t it?
  2. No Personalization: You can’t have something which you really looking for.. You have to see a generic view, even if you are not bothered about the rest 90% of the content.
  3. Poor UI: UI used to be poor with bad response from server.
Dynamic Web Pages with Scripting:

After some time, when the requirements and needs changed, pages were dynamic on user inputs. Users could able to get dynamic data on the same page.
  • Pros:
  1. Dynamic: Now the pages went dynamic depending on the user inputs and different other criteria’s.
  2. Selectively Cacheable : As the pages were dynamic, so dynamic contents were not applicable for caching.
  3. Highly Indexable: They were also well indexed by the search engines.
  4. Personalization: As the user is able to provide inputs, they could able get the user a view that user is looking for.
  • Cons:

  1. High Computation: To make a page dynamic, it required a computation overhead in different manner. Lot of scripting technologies had been adopted to create dynamic web pages.
  2. Hard to Create: Same page different data representations made very difficult for the browser to cache.
  3. Poor UI: Even though the pages went dynamic, the UI used to be poor, less interactive and less responsive.
Dynamic Pages with JavaScript:

Introduction to JavaScript to the web development made the pages bit more interactive and responsive. Developers started using JavaScript for basic form validation and other activities in DOM.
  • Pros:
  1. Enhanced Usability: With the help of JavaScript, developers could able to give a good response to some of the actions, where there is no back-end data involvement.
  2. Reduced Trips to Server: As most of the validations went front-end, there was a network band width save. Developers eliminated the validation calls from server-side.
  • Cons:

  1. Abused Annoyed Users: As JavaScript is a client-side technology, lot of users started misusing that.
  2. Business Logic Often Implemented Twice: With reference to validation, sometimes the validation logic and other business logic were implemented both at client side and server-side.
AJAX – Web 2.0:

Google came up with a new approach of interacting with server. With the help of Web 2.0, Google launched Map API and Gmail. Server interaction made possible both synchronously and asynchronously with out submitting an action to the server.
  • Pros:
  1. Killer UI: With the introduction of AJAX, the look and feel of the UI went out of the world with lot of UI components.
  2. More Responsive Apps: User were able to interact with application easily without much effort and as with AJAX only the data used to be get streamed the via network, the response for a particular action used to be very fast.
  • Cons:
  1. Difficult to Cache: As there are hardly any static content, at least, it was very difficult to cache the whole page.
  2. Impossible to Index: With dynamic data, indexing a page for a search engine was quite impossible.
  3. Required JavaScript: With introduction to AJAX, there was a need for skilled UI developers in industry.
Unobtrusive JavaScript:

After some time, JavaScript proved to be a clumsy language unsuitable for serious application development. This has been largely due to inconsistent implementations of the language itself and the Document Object Model in various browsers, and the wide spread use of buggy copy-and-paste code. Run time errors were so common (and so difficult to debug), that few programmers even tried to fix them, as long as the script behaved more or less the way it was supposed to, scripts often failed completely in some browsers. At that moment the industry was again fallen back to the basic HTML way of presenting the view. And this is the time when some MVC 2 frameworks were evolved. Unobtrusive JavaScript is a general approach to the use of JavaScript in web pages. Though the term is not formally defined, its basic principles are generally understood to include Separation of functionality (the "behavior layer") from a Web page's structure/content and presentation, best practices to avoid the problems of traditional JavaScript programming (such as browser inconsistencies and lack of scalability) and progressive enhancement to support user agents that may not support advanced JavaScript functionality.
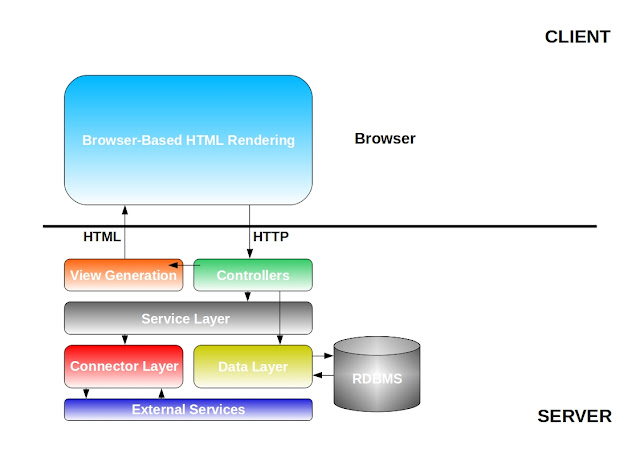
Architecture of a Old Web Application
  • Pros:
  1. Wider Compatibility: As again the UI started coming from server as a HTML, it has a better compatibility with wider range of browsers.
  2. Just as Rich UI: As the UI was getting streamed from server, it was a raw HTML with rich components.
  3. Just as Responsive: As designers were still stick to JavaScript for some non-business related activities, the response of some activities were still good.
  • Cons:
  1. Higher development cost: Generally to make a simple application, now you need a big team with developers, architects and some managers to make sure everything happening as per the plan, which is a time consuming process..
  2. Requires thoughtful engineering: As you can’t make changes to the final product as it would have lot of dependencies and you never know one change will break how many other things. So you have to have a very good design looking at the future scope.
Client Side Applications:

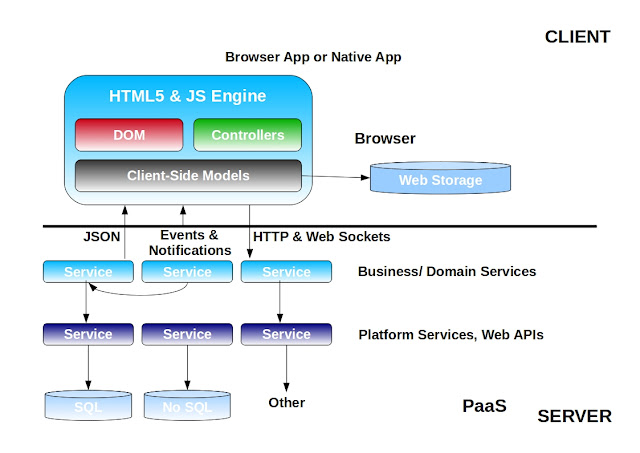
Over the time designers noticed one common thing in all approaches, i.e. there are unnecessary data like HTML are also flowing from server to client and that is a major problem for slowness of the application. Now there is a significant contribution to the JavaScript APIs from the open source contributors around the world.  Business logic is no more part of the server, all moved to the front-end along with the MVC. Application state was started storing in front-end, only the permanent state has been stored in back-end. As there are no more MVC and business logic in backend, the back-end part of the applications are turning to services. SOA also has a greater impact on the current design, instead of thick  fat web application, it is getting divided in to smaller chunks to make the back-end healthy and independent with each other. Introduction of RESTful web services made front-end directly interact with services. Recently Google announced the Chrome Laptops, which are totally on the browser, so looking at the current processor architecture and memory capacity of personal computers and laptops, the browser is capable of doing complex computations and also capable of storing significant data required for a particular page.
Architecture of a Modern Web Application
  • Pros:
  1. Reduce server workload : As the MVC and business logic is moving to the client side, there is minimal computation at the server side, may be the CRUD operation on a object. And again with service call only the data is flowing in network, so there is a significant save in network band width.
  2. Application is highly cacheable: As the business logic and MVC is moving to front-end, front-end is making use of system resources to store data.
  3. Extremely rich UI: As I explained above, there are lot of contribution to some of the open source projects and there are lot of light weight JavaScript APIs are available now.
  • Cons:
  1. Content not indexable: As the content is 100% dynamic, there is no scope for the search engines to index the page.
  2. JavaScript: Now it is the time to learn JavaScript and start using that. Lot of companies are recruiting dedicated UI developers.
  3. Often requires a modern browser: Along with JavaScript, there are some other technologies like HTML5 and CSS3 are also adopted with context to the new architecture.. So some time user need a updated browser to use the application.
So now the web application is moving from server side application to smart clients and services. Simple templates can render on client, JSP will no more render the client side. Some of the modern techniques like web socket(for subscribing messages from server), web worker(worker and job model like Executor Framework) and DOM event will be adopted for the web application to make it more responsive and interactive.

With the current configuration standard of a personal computer or a laptop, this approach is proving it’s capability.. As discussed about some of the web sites like facebook.com, amazon.com, ebay.com etc. and some of the browser apps like TweetDesk, RSS Readers etc. are very popular for their performance.

The definition of back-end and front end are shifting to front-end != client and back-end != server. There are lot technologies are evolving and there is a huge support from the open source contributors. Now it is the time for a java developers to take interest in JavaScript and start learning the new technologies like css3, HTML5 with some JavaScript libraries like jQuery, s2js, cujo.js, scripted, SockJS, monty-hall, monty-hall-ui etc.

Even though, I have drafted this article for you guys, I want to give the credit to Jeremy Grelle, SpringSource Staff Engineer and open source contributor. I would also like to thank VMWare for inviting me to SpringOne India 2012 Conference.

I will soon be developing some small applications using this architecture and will probably deploy those in the Cloud, so that you people can play around that.

Tuesday, August 14, 2012

SPEED UP WITH MEMCACHED

Is your website running into performance bottlenecks? Does the database or backend feel like a really expensive resource, even though you’ve got a huge cluster set up to improve parallel processing? Read on to find out why you should be including Memcached, in your SOA based application.


Caching is a concept that almost all developers use in some form or the other in their applications. It’s basically about storing a piece of information in memory so that it can be retrieved quickly. Caching is mostly used for data that is accessed repeatedly, so that instead of calculating/retrieving from the disk repeatedly, which takes time, we can instead directly look it up in the cache, which is much faster. Caches can be used at multiple places in the application stack, so you have quite a few options when it comes to choosing where to cache, what to cache and how to cache.

Here are some of the techniques on how and where you might like to cache data:

  • Browser caching: As Web developers might be aware, some data can be cached on the client-side in the browser, like images, etc., so that they are automatically used when repeated requests for that resource are made.
  • Server-side caching: Data or objects can alternatively be cached on the server-side itself. This can either be a local server cache, a centralised caching server or a distributed cache.
  • Local database query cache: A good database caches the database queries or data internally, so as to improve the speed of looking up data as well as the performance of the database.
You may choose to implement a cache in one way or another, or you might use a combination of more than one technique to cache different types of data at separate levels. But more importantly, it is helpful to know whether you even need caching in the particular application/use-case you are thinking about.

Most people, in the process of implementing a cache, actually lose out because it was wrongly implemented. So the cache ends up slowing down the application, instead of speeding it up. Getting fancy software with fancy features doesn’t always make sense, but using even the modest ones in the right way, does.

Why you need Memcached

This discussion assumes that you have set up a cluster, and you want to implement caching. In this case, what happens if you start caching on each node independently? You will see that some nodes face memory issues, while others have quite a bit of memory left. Moreover, most of the data stored in their individual caches is redundant.

This calls for a centralised caching mechanism that makes sense, such that the data being cached is evenly distributed and unique for the whole cluster. And memcached is the right thing to choose.

It provides a solution in which the available memory in the cache is the sum of that on all nodes on which the Memcached instance is running. So if, for example, you have 10 nodes, with each being allocated 1 GB of memory for caching, you get a total of 10 GB of cache available for the whole cluster. Here are some features in Memcached that might lure you into using it within the context of your application:

  • Easy scalability: This feature is applicable for almost any software with the tag of “distributed”, but still, it is worth noting that Memcached needs minimal configuration to add a new node, with almost no special interconnect requirements. Your available memory in the cache just increases on the fly.
  • Hidden complexity: Memcached hides beneath it all the complexity associated with storing/retrieving the data from the cache. All we need to provide is the key associated with the data. The whole task of determining which node to store the data on, or to retrieve it from, is done by the Memcached client itself.
  • Minimal impact of a node failure: Even if a particular Memcached node does fail, it has almost no impact on the overall cache other than reducing the available memory, and a minor increase in the number of cache misses.
  • Flexible architecture: Memcached does not impose a restriction on all nodes to have a uniform cache size. So, some of your nodes with less physical memory can be set up to contribute perhaps only 512 MB to the cluster, while others may have 2 GB of memory dedicated for the Memcached instance. Apart from this, you can even run more than one instance of Memcached on a single node.
  • Multiple clients available: Memcached has client APIs available for various languages like PHP, C++, Java, Python, Ruby, Perl, .NET, Erlang, ColdFusion and even more.
  • Cross-platform: Memcached is available for a wide variety of platforms including Linux, BSD and Windows.
  • Multi-fetch: With the help of this feature, we can request values for more than one key at once, instead of querying them in a loop, one by one, which takes a lot of network round-trips.
  • Constant time functions: It takes the same amount of time to perform an operation in memory, whether it is a single key or a hundred. This corresponds to the Multi-fetch feature discussed before.


Saturday, August 11, 2012

THIRD PARTY MEMORY VS JVM MEMORY

Advantages of JVM memory over third party memory:

  1. JVM memory is faster (no network).
  2. JVM memory won’t require serialization, you have Java objects available to you.


Advantages of third party memory over JVM memory:

  1. It can be accessed by more than one application server, so your cache will be shared among all your app servers.
  2. It can be accessed by a variety of different servers, so long as they all agree on the key scheme and the serialization.
  3. It will discard expired cache values, so you get time-based invalidation.

Most of the technology selectors use either Memcached or Redis and there are several open source APIs with several languages to work with.

Related Topics:
THIRD PARTY MEMORY VS JVM MEMORY
MULTICORE ARCHITECTURE AND SOA
MULTITHREADING AND MULTICORE CPU
JAVA CONCURRENCY - PERFORMANCE BOOST
Java 5 Executor Framework
Concurrency: Callable and Future

Thursday, July 19, 2012

GIT - CONTENT MANAGEMENT

6:14:00 PM Posted by Satish , , , No comments
The following will guide you through a typical Git workflow. You will create a few files, create a local Git repository and commit your file into this repository. Afterwards, you clone the repository and push and pull some changes between the repositories. The comments (marked with #) before the commands explain the specific actions.


Open a command line / shell for the operations.


Create content

The following creates some files with some content that will later be placed under version control.

#Switch to home
cd ~/
# Create a directory
mkdir ~/repo01
# Switch into it
cd repo01
# Create a new directory
mkdir datafiles
# Create a few files
touch test01
touch test02
touch test03
touch datafiles/data.txt
# Put a little text into the first file
ls >test01 

Create repository, add and commit

# Initialize the local Git repository
git init
# Add all (files and directories) to the Git repository
git add .
# Make a commit of your file to the local repository
git commit -m "Initial commit"
# Show the log file
git log 
Every Git repository is stored in the .git folder of the directory in which the Git repository has been created. This directory contains the complete history of the repository. The .git/config file contains the local configuration for the repository.

The following will create a Git repository, add the files to the repository's index and commit the changes.

See differences via diff and commit changes

The git diff command allows the user to see the changes made. In order to test this, make some changes to a file and check what the git diff command shows to you. Then, commit the changes to the repository.

# Make some changes to the file
echo "This is a change" > test01
echo "and this is another change" > test02

# Check the changes via the diff command 
git diff

# Commit the changes, -a will commit changes for modified files
# but will not add automatically new files
git commit -a -m "These are new changes" 

Status, Diff and Commit Log

The following helps you see the current status and the list of commits in your repository.

# Make some changes in the file
echo "This is a new change" > test01
echo "and this is another new change" > test02


# See the current status of your repository 
# (which files are changed / new / deleted)
git status
# Show the differences between the uncommitted files 
# and the last commit in the current branch
git diff

# Add the changes to the index and commit
git add . && git commit -m "More chaanges - typo in the commit message"

# Show the history of commits in the current branch
git log
# This starts a nice graphical view of the changes
gitk --all 

Correction of commit messages - git amend

The git amend command makes it possible to change the last commit message.

In the above example the commit message was incorrect as it contained a typo. The following will correct this via the --amend parameter.

git commit --amend -m "More changes - now correct" 

Delete files

If you delete a file which is under version control git add .will not pick this file up. You need to use the git commit command with the -a flag or the -A flag in the git add command.

# Create a file and put it under version control
touch nonsense.txt
git add . && git commit -m "a new file has been created"
# Remove the file
rm nonsense.txt
# Try standard way of committing -> will not work 
git add . && git commit -m "a new file has been created"
# Now commit with the -a flag
git commit -a -m "File nonsense.txt is now removed"
# Alternatively you could add deleted files to the staging index via
git add -A . 
git commit -m "File nonsense.txt is now removed" 

Tuesday, July 17, 2012

GIT - Setup

8:03:00 PM Posted by Satish , , , No comments

Git allows you to store global settings in a .gitconfig file. This file is located in the user home directory. As mentioned before Git stores the committer and author in each commit. This and additional information can be stored in the global settings.

The following will configure Git so that a certain user and email address is used, enable color coding and tell Git to ignore certain files.

User Configuration

Configure your user and email for Git via the following command.

# Configure the user which will be used by git
# Of course you should use your name
git config --global user.name "Example Surname"
# Same for the email address
git config --global user.email "your.email@gmail.com"
# Set default so that all changes are always pushed to the repository
git config --global push.default "matching" 

To query your Git settings, execute the following command:

git config --list

Color Highlighting


The following will enable some highlighting for the console.

git config --global color.status auto
git config --global color.branch auto 

Ignore certain files


Git can be configured to ignore certain files and directories. This is configured via the .gitignore file. This file can be in any directory and can contain pattern for files. For example, you can tell Git to ignore the bin directory via the following .gitignore file in the main directory.

bin 


Git also offers the global setting core.excludesfile to specify global excludes.

You can also setup a global .gitignore file valid for all Git repositories.

# Create a ~/.gitignore in your user directory
cd ~/
touch .gitignore

# Exclude bin and .metadata directories
echo "bin" > .gitignore
echo ".metadata" >> .gitignore

# Configure Git to use this file
# as global .gitignore

git config --global core.excludesfile ~/.gitignore 


Tracking empty directories with .gitkeep

Git will ignore empty directories, e.g. do not put them under version control. If you want to track such directories, is it convention to put files called ".gitkeep" in these directories. The file could be called anything; Git assigns no special significance to this name. As the directory now contains a file, Git will include it into its version control mechanism.

GIT - INSTALLATION

7:07:00 PM Posted by Satish , , , No comments
On Ubuntu you can install the Git command line tool via the following command:

sudo apt-get install git-core 
For other Linux distributions please check your vendor documentation.

A windows version of Git can be found on the msysgit Project site. The URL to this webpage is http://code.google.com/p/msysgit/.

GIT - INTRODUCTION

6:43:00 PM Posted by Satish , , , No comments
Git is a distributed version control system (DVCS) written in C. A version control system allows the creation of a history for a collection of files and includes the functionality to revert the collection of files to another state. Another state might be a different collection of files or different content in the files.

You may, for example, change the collection of files to a state from 2 days ago or you may switch between states for experimental features and production issues.

The collection of files is usually called "source code". In a distributed version control system everyone has a complete copy of the source code (including the complete history of the source code) and can perform version control operations against this local copy. The use of a DVCS does not require a central code repository.

If you make changes to the source code you mark them as relevant for the version control (add them to the index / staging) and then add them to the repository (commit).

Git maintains all versions. Therefore you can revert to any point in your source code history using Git.

Git performs commits to your local repository and you can synchronize your repository with other (remote) repositories. Git allows you to clone repositories, e.g. create an exact copy of a repository including the complete history of the source code. Owners of repositories can synchronize changes via push (transferring changes to a remote repository) or pull (getting changes from a remote repository).

Git supports branching, e.g. you can have different versions of your source code. If you want to develop a new feature, you may open a branch in your source code and make the changes in this branch without affecting the main line of your code.

Git can be used from the command line. You also find graphical tools, for example EGit for the Eclipse IDE.

Git requires that changes are marked explicitly for the next commit. For example, if you make a change in a file and want that this change is relevant for the next commit, you have to add the file to the so-called "staging index" via the git add file command. The staging index will be a complete snapshot of the changes.

New files must always be explicitly added to the index. For files that have already been committed, you can use the -a flag during a commit.

Saturday, May 15, 2010

INDIC LANGUAGE PDF GENERATION - JAVA

3:42:00 PM Posted by Satish , , 5 comments

Recently I was working in a task to create PDF document using languages other than English. It was working quite well for international languages. But when it came to indic languages, it did not work properly. I tried with lots of fonts and it did not even work for Hindi. I posted a question to i-text and got to know that, the shaping for indic languages is not yet done and it is not going to be a week end effort to finish. Some Indian developer need to contribute source code for that. Then I started looking at other alternatives. In the mean while I used to bring up this to my friends. I worked two years at Analytica India Pvt. Ltd. There I used to work with a Ubuntu work station (I am a java developer and love to work on Ubuntu than Windows). And I used to export my .odt files to PDF using open office. One of my old colleague told me that he created a hindi .odt file and exported that to PDF and that worked perfectly fine for him. So I decided to spend some time in that.

While googling for OpenOffice SDK, I came across Mr. Raman's blog, who worked with CDAC to create indic language jasper report using OpenOffice. I saw some hope of light and after some discussions with Mr. Raman, I finally started working with OpenOffice SDK. 
I played around the API for two three days and finally I could able to generate PDFs with of the indian languages. Some languages like telegu, assamise, oriya, malayalam did not work, but some indian contributers are working towords that. Hope those missing languages will be available soon.

Next I will demonstrate the full idea how I used the OpenOffice SDK to create PDFs.

Environment set up:

1. Need to download OpenOffice Engine and install it to the computer.
2. Need to download the OpenOffice SDK. This SDK contains lot of examples for developer reference.

Notes:

1. I used some off the classes that Mr. Raman had already wrote for jasper report. I modified the classes according to my requirement.
2. I used five jars from OpenOffice. I shared my workspace(eclipse). But I did it with OpenOffice 2.4.0 and JDK 1.4. You better try with updated OpenOffice 3.x.x and JDK 6.

Work Flow:

1. I took the indic language scripts from some web sites and stored those to database table.
2. First I created the .odt stream and wrote the content there and later exported all that to .pdf.
3. My whole eclipse workspace is shared. You may need to modify to make that work.

Source Code:

You can also pull the source code from GitHub.