A Technology Blog About Code Development, Architecture, Operating System, Hardware, Tips and Tutorials for Developers.

Showing posts with label HOWTO. Show all posts

Thursday, December 20, 2012

List and Set implementations are not marshalled with JAXB?

7:09:00 PM Posted by Satish , , , No comments
Snap of code what I was doing:


 1
 2
 3
 4
 5
 6
 7
 8
 9
10
11
12
13
14
@XmlRootElement
public class FooBar {
  public String title;
  public FooBar(String t) {
    this.title = t;
  }
}
@XmlRootElement
@XmlSeeAlso({FooBar.class})
public class FooBarSet extends ArrayList<FooBar> {
  public FooBarSet() {
    this.add(new FooBar("FooBar"));
  }
}

Then, while marshaling:

1
2
3
JAXBContext ctx = JAXBContext.newInstance(FooBar.class);
Marshaller msh = ctx.createMarshaller();
msh.marshal(new FooBar(), System.out);

This is what I saw:

1
2
<?xml version="1.0"?>
<FooBarSet/>

Why I am not getting the list of FooBar ??????

The Answer is the elements to be marshalled must be public, or have the @XMLElement anotation. The ArrayList class and my class FooBarSet do not match any of these rules. I have to define a method to offer the FooBar values, and anotate it.


So the modified class is:

 1
 2
 3
 4
 5
 6
 7
 8
 9
10
11
12
@XmlRootElement
@XmlSeeAlso({FooBar.class})
public class FooBarSet extends ArrayList<FooBar> {
  public FooBarSet() {
    this.add(new FooBar("FooBar"));
  }

  @XmlElement(name = "FooBar")
 public List<FooBar> getFooBarSet() {
     return this;
 }
}

Now the output:

1
2
3
4
5
<fooBarSet>
 <FooBar>
  <title>FooBar</title>
 </FooBar>
</fooBarSet>

Sunday, December 19, 2010

RESOURCE CACHING FROM APACHE

3:17:00 PM Posted by Satish , , , , No comments
1. Uncomment the following lines from the "$apache_home/conf/httpd.conf".

LoadModule expires_module modules/mod_expires.so
LoadModule headers_module modules/mod_headers.so
LoadModule deflate_module modules/mod_deflate.so

2. Add the following lines to "$apache_home/conf/mod-jk.conf" at the last.
#cache settings

ExpiresActive On

    Options FollowSymLinks MultiViews
    AllowOverride All
    Order allow,deny
    Allow from all
    ExpiresDefault A25920003

Now you can check the request header, the resources can be in browser's cache for 30 days.

STATIC RESOURCE APACHE PROXY

2:46:00 PM Posted by Satish , , , , , No comments

1. Dump your application static resources i.e images, css, html, javascript to "$apache_home\htdocs\".

2. Add the following lines to the "$apache_home/conf/mod-jk.conf" bellow "# Let Apache serve the images"

JkUnMount /__application__/css/* node1
JkUnMount /__application__/images/* node1
JkUnMount /__application__/xmlhttp/* node1
JkUnMount /__application__/js/* node1

Note: In case of multiple nodes, the load balancer name in place of node1.

3. Add the following lines to the "$apache_home/conf/uriworkermap.properties"  at the last.

!/*/css/*=*
!/*/images/*=*
!/*/xmlhttp/*=*
!/*/js/*=*

4. Now remove the static resources from your war/ ear.

APACHE SETUP FOR JBOSS

2:36:00 PM Posted by Satish , , , , No comments
1. Download Apache HTTP 2.2 from here(http://olex.openlogic.com/package_versions/download/9478?package_version_id=5577&path=openlogic%2Fapache%2F2.2.17%2Fopenlogic-apache-2.2.17-windows-ins-no-ssl-1.zip)


2. Unzip the file and double click on the installation file. Next follow the screen instructions to install.

3. After installation click the test configuration to test if Apache is working or not.

4. Now start the apache by clicking start from Apache sub menu.

5. Request for http://localhost/ to check the status.

6. Now time to confirure the proxy set up for Jboss. To do so we are going to use the the mod jk module in apache http.

7. Download themod_jk-1.2.31-httpd-2.2.3.s from here(http://www.apache.org/dist/tomcat/tomcat-connectors/jk/binaries/win32/jk-1.2.31/mod_jk-1.2.31-httpd-2.2.3.so).

8. Rename the file to mod_jk.so and put to the "$apache_home/modules/" folder.

9. Now open the "$apache_home/conf/httpd.conf" and add the following lines at the end.

<IfModule !mod_jk.c>
  LoadModule jk_module modules/mod_jk.so
</IfModule>

#Include mod_jk configuration file
Include "C:/Program Files/Apache Software Foundation/Apache2.2/conf/mod-jk.conf"

Note: change the path acording to your environment.

10. Create a file "$apache_home/conf/mod-jk.conf" and add the following content to that.

# Load mod_jk module
# Specify the filename of the mod_jk lib
#LoadModule jk_module modules/mod_jk.so

# Where to find workers.properties
#JkWorkersFile conf/workers.properties
JkWorkersFile conf/workers.properties


# Where to put jk logs
#JkLogFile logs/mod_jk.log
JkLogFile logs/mod_jk.log

# Set the jk log level [debug/error/info]
JkLogLevel info

# Select the log format
JkLogStampFormat "[%a %b %d %H:%M:%S %Y]"

# JkOptions indicates to send SSK KEY SIZE
# Notes:
# 1) Changed from +ForwardURICompat.
# 2) For mod_rewrite compatibility, use +ForwardURIProxy (default since 1.2.24)
# See http://tomcat.apache.org/security-jk.html
JkOptions +ForwardKeySize +ForwardURICompatUnparsed -ForwardDirectories

# JkRequestLogFormat
JkRequestLogFormat "%w %V %T"

# Mount your applications
JkMount /__application__/* node1

# Let Apache serve the images
#JkUnMount /__application__/images/* node1


# You can use external file for mount points.
# It will be checked for updates each 60 seconds.
# The format of the file is: /url=worker
# /examples/*=ajp13
JkMountFile  conf/uriworkermap.properties

# Add shared memory.
# This directive is present with 1.2.10 and
# later versions of mod_jk, and is needed for
# for load balancing to work properly
# Note: Replaced JkShmFile logs/jk.shm due to SELinux issues. Refer to
# https://bugzilla.redhat.com/bugzilla/show_bug.cgi?id=225452
JkShmFile run/jk.shm

# Add jkstatus for managing runtime data
<Location /jkstatus>
JkMount status
Order deny,allow
Deny from all
Allow from 127.0.0.1
</Location>

11. Now create "$apache_home/conf/workers.property" and add the following lines to that.

# Define list of workers that will be used
# For mapping requests
worker.list=node1,status


# Define Node1
worker.node1.port=8009
worker.node1.host=10.5.1.26
worker.node1.type=ajp13
#ping_mode as of mod_jk
worker.node1.ping_mode=A
#worker.node1.socket_timeout=10
        
# Status worker for managing load balancer
worker.status.type=status
#worker.localhost.host=10.5.1.26

Note: Change the host IP according to your IP. This configuration has been done for only one node. So there is no load balancer. You can add more than two nodes and a load balancer to manage. You can also enable sticky session if Jboss clustering and session replication is not enabled. 

12. Now create "$apache_home/conf/uriworkermap.properties" and add the following lines to that.

# Mount the Servlet context to the ajp13 worker
/jmx-console=node1
/jmx-console/*=node1
/web-console=node1
/web-console/*=node1
/test=node1
/test/*=node1

13. Now Jboss has to be configured to work with Apache.

A) Open "$jboss_Home/server//deploy/jboss.web-deployer/server.xml"

search for the following line and specify jvmRoot attribute to node1 as bellow.
Engine name = ”jboss.web” default host = “hostname” jvmRoute = “node1”

B)  Open "$jboss_Home/server/<instance_name>/deploy/jboss.web-deployer/meta-INF/jboss-service.xml"

search for "useJK" and make the value to "true" as bellow.
<attributename = “UseJK” > true</attribute>

14. Now restart the both web and app server. To test access test from web server DNS ie http://localhost/test.

Tuesday, September 28, 2010

EASY JSF WITH ECLIPSE - BASICS

8:26:00 PM Posted by Satish , , , , No comments

What is JSF

 JavaServer Faces (JSF) is a UI component based Java Web application framework. JSF is serverbased, e.g. the JSF UI components and their state are represented on the server with a defined life-cycle of the UI components. JSF is part of the Java EE standard.


A JSF application run in a standard web container, for example Tomcat or Jetty . 

A JSF application

A JSF application consists of web pages with JSF UI components. A JSF application requires also some configuration files ("faces-config.xml" and "web.xml").

The faces-config.xml defines:

  1. Managed Bean - the data elements of the JSF application (managed beans and backing beans) Represents a Java class which will be created dynamically during runtime of the JSF application. It can be defined for which scope the bean is valid (Session, Request, Application or none).
  2. the navigation between web pages
  3. data validators - Used to check the validity of UI input
  4. data converters -Used to translate between UI and model
Managed beans are simple Java objects (POJO's) which are declared in "faces-config.xml" and can be used in an JSF application. For example you can define a Java object "Person". Once you define the object in faces-config.xml you can use the attributes of Person in your JSF UI components, e.g. by binding the value "firstName" of this object to an JSF input field.

JSF uses the Unified Expression Language (EL) to bind UI components to object attributes or methods. 

Value and Method Binding

In JSF you can access the values of a managed bean via value binding. For value binding the universal Expression Language (EL) is used (to access bean and / or methods). In JSF you do not need to specify the get() or set() method but just the variable name.

Method binding can be used to bind a JSF component, e.g. a button to an method of a Java class.

  • Expression Language statements either start with "${" or with "#{" and end with "}". JSP EL expressions are using the ${...} syntax. These EL expressions are immediately evaluated. JSF EL expressions are of the type #{...}. These are only evaluated when needed (and otherwise stored as strings).

Prerequisites to use JSF  

To use JSF you need: 

  1. JSF Implementation (in the form of the JSF jars)
  2. The JSTL tags library
  3. A Java runtime environment
  4. A web-container to use JSF in (for example Tomcat)
JSF Main features

JSP has the following main features:

  1. JSP is based on the Model-View-Controller concept
  2. JSP has a stateful UI component model, e.g. each component is aware of its data
  3. JSF separates the functionality of a component from the display of the component. The renderer is responsible of displaying the component for a certain client. This renderer can get exchanged. The standard renderer for JSF components is the HTML renderer.
  4. JSP support listeners on UI components
  5. JSP support data validation, data binding and data conversion between the UI and the model
JSP and JSF 

In this tutorial the JSF application will be build based on JavaServer Pages (JSP's). JSTL tags are used to include JSF UI components into the JSP. This is standard in JSF 1.2. The JSF 2.0 version is using Facelets. 

JSF configuration files

JSF is based on the following configuration files:

  1. web.xml - General web application configuration file
  2. faces-config.xml - Contains the configuration of the JSF application.
web.xml

JSF requires the central configuration list "web.xml" in the directory WEB-INF of the application. This is similar to other web-applications which are based on servlets.

You must specify in "web.xml" that a "FacesServlet" is responsible for handling JSF applications. "FacesServlet" is the central controller for the JSF application. "FacesServlet" receives all requests for the JSF application and initializes the JSF components before the JSP is displayed.

faces-config.xml

"faces-config.xml" allows to configure the application, managed beans, convertors, validators, and navigation.


Sunday, September 26, 2010

EASY JSF WITH ECLIPSE - CONFIGURATION

8:33:00 PM Posted by Satish , , , , No comments


This tutorial was developed with Java 1.6, JavaServerFaces 1.2, the Apache MyFaces JSF implementation, Tomcat 6.0 and Eclipse 3.5.

Eclipse & Tomcat

For JSP development you need the Eclipse and an installed Tomcat.
JSF library

A JSF library is required. We will later use Eclipse to download and install the Apache MyFaces JSF implementation during project creation.

JSLT library

Download the JSLT library from https://jstl.dev.java.net/.

JSF Project

Create JSF Project

Create a new Dynamic Web Project "JSF". 
Under "Configuration" select "JavaServer Faces v1.2".


Press next until you see the following screen. The JSF and JSTL is showing in the next screen, because I have already configured to my eclipse. For the first time nothing will be there. 


The first time you create a JSF project you need to install / download a JSF implementation. Press the "Download library..." button and select the Apache Library and install it.


Press Manage libraries and create a library for JSTL.


Press new now.


Add the two downloaded JSTL jars and press OK.


Check JSTL and click Finish.


Review the "web.xml" file. It has an entry for the Faces Servlet and for the servlet mapping. Also the file "faces-config.xml" has been created.

Right click on the JSF project and click on Properties. Go to Java Build path -> Libraries and expand the JSF and JSTL library. You can see all the jars associated to the library and the "Publish/ export dependency" shows where the jars has to be placed, when you deploy to the server.


Next step is to add tomcat 6 to eclipse.

Saturday, July 17, 2010

TOMCAT SSL CONFIGURATION IN UBUNTU

11:12:00 PM Posted by Satish , , , , No comments

This post is made considering the the system is having jdk 6 and Tomcat 6 installed and "JAVA_HOME" environment variable is set.

Bellow are the steps to configure tomcat to listen https port (8443)

1. Create a certificate keystore by executing the following command. It will ask few questions. It will also ask one password to enter. You have to remember this password as you need to specify that to configuration file.  You can store the keystore any where.
    keytool -genkey -alias tomcat -keyalg RSA 
    \-keystore /usr/local/tomcat/conf/.keystore

2. Now configure "tomcat_home"\conf\server.xml, add the following code.
    <Connector
    port="8443" 
    protocol="org.apache.coyote.http11.Http11Protocol"   
    maxThreads="200"
    scheme="https" secure="true" SSLEnabled="true"
    keystoreFile="/usr/local/tomcat/conf/.keystore"  
    keystorePass="password"
    clientAuth="false" 
    sslProtocol="TLS"/>  

You are done with your configuration. Save the "server.xml" file. Restart your tomcat. Now type https://localhost:8443

This should show you the same tomcat homepage but in secured format.

Wednesday, June 23, 2010

GSM MODEM WITH MY GSM PHONE

10:02:00 PM Posted by Satish , , , , 6 comments

INTRODUCTION TO GSM MODEM:

A GSM modem is a wireless modem that works with a GSM wireless network. A wireless modem behaves like a dial-up modem. The main difference between them is that a dial-up modem sends and receives data through a fixed telephone line while a wireless modem sends and receives data through radio waves. Computers use AT commands to control modems. Both GSM modems and dial-up modems support a common set of standard AT commands.

MOBILE PHONE OR GSM MODEM:


In general, a GSM/GPRS modem is recommended for use with a computer to send and receive messages. This is because some mobile phones have certain limitations comparing to GSM/GPRS modems. Using my Nokia 3110C, I am not able to receive any messages to my computer. And also I noticed the phone always run out battery in no time. But there are some phones in the market which support all the AT commands. Here is the list of AT Commands supported by the Nokia phones.

SETUP THE MOBILE PHONE AS GSM MODEM:

1. Connect your mobile phone to a computer and set up the corresponding wireless modem driver.
2. Run MS HyperTerminal by selecting Start -> Programs -> Accessories -> Communications -> HyperTerminal.
3. In the Connection Description dialog box, enter a name and choose an icon you like for the connection. Then click the OK button.
-->

4. In the Connect To dialog box, choose the COM port that your mobile phone is connecting to in the Connect using combo box. For example, choose COM1 if your mobile phone is connecting to the COM1 port. Then click the OK button.
Note:
Sometimes there will have more than one COM port in the "Connect Using" combo box. To know which COM port is used by your mobile phone, follow the procedure below:
a. Go to Control Panel -> Phone and Modem Options".
b. Then click the Modems tab. In the list box, you can see which COM port the mobile phone or GSM/GPRS modem is connected to.
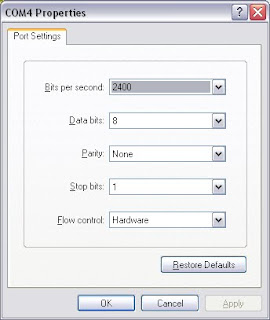
5. The "Properties" dialog box comes out. Enter the correct port settings for your mobile phone. Then click the OK button.
Note:
To find the correct port settings that should be used with your mobile phone, one way is to consult the manual of your mobile phone. Another way is to check the port settings used by the wireless modem driver that you installed earlier.
To check the port settings used by the wireless modem driver, follow these steps:
a. Go to Control Panel -> Phone and Modem Options -> Modems tab.
b. Select your mobile phone in the list box.
c. Click the "Properties" button.
d. The Properties dialog box appears. Click the Advanced tab and then click the Change Default Preferences button.
e. The Change Default Preferences dialog box appears. The Port speed field on the General tab corresponds to HyperTerminal's "Bits per second" field. You can also find the setting for flow control on the General tab. On the Advanced tab, you can find the settings for data bits, parity and stop bits.
6. Type AT in the main window. A response OK should be returned from the mobile phone or GSM/GPRS modem. Type AT+CPIN? in the main window. The AT command AT+CPIN? is used to query whether the mobile phone is waiting for a PIN (personal identification number, i.e. password). If the response is +CPIN: READY, it means the SIM card does not require a PIN and it is ready for use. If your SIM card requires a PIN, you need to set the PIN with the AT command AT+CPIN=[PIN].

Now the mobile phone is configured to work as a GSM modem.
JAVA CONFIGURATION FOR COM PORT:

As the modem is connected to the COM port of the computer, you have to use Java Communications API.
Sun provides an API extension for communicating with parallel and serial ports, specifically for Solaris and Windows environments. The API can be found here. There are also third party APIs and an open source implementation, which works on several platforms including Linux. You can download the Java Communications API from here.

INSTALLING THE JAVA COMMUNICATIONS API IN WINDOWS ENVIRONMENT:

Among the items that you download from Sun are three very important files:
1. comm.jar
2. win32com.dll
3. javax.comm.properties

For the JVM to recognize the serial ports, proper placement of these files is important. And have found the following installation methods to be effective:

1. comm.jar should be placed in:

    %JAVA_HOME%/lib
    %JAVA_HOME%/jre/lib/ext

2. win32com.dll should be placed in:

    %JAVA_HOME%/bin
    %JAVA_HOME%/jre/bin
    %windir%System32

3. javax.comm.properties should be placed in:

    %JAVA_HOME%/lib
    %JAVA_HOME%/jre/lib

Now Java is correctly configured to interact with the COM ports. Now it is the time to write a program to send and receive message.

SENDING AND RECEIVEING SMS:

For sending and receiving SMS I am using the following procedure.

1. Connecting to the COM port where the modem is connected.
2. Registering the listener for serial port event.
3. Using the following set of AT commands to send the SMS.

            AT (To check the modem)
            OK (Response - modem connected)

            AT+CMGF=1 (To set the text messaging mode)
            OK (Response - text messaging mode set successfully)

            AT+CSCA="+979797979796464" (To set the message center)
            OK (Response - message center is set properly)

            AT+CMGS="+91021482048023" (To set the recipient no and open the message writing prompt)
            >my test message + [Ctrl+z] ("Ctrl+z" is to come out of the message writing prompt)
            OK             
            CMGS: +919886599334 (Message sent)
    
4. As we have registered to the serial port events, when ever any data will come to the serial port the implemented method will print the data to the console. It is applicable for receive message also.

If you are using the GSM/GPRS modem, then lot of other features of phone like call receiving, making a call, call forwarding, answering machine etc can be developed for any enterprise application. 

SHARED ITEMS:

1. Source Code or you can fork at GitHub.

Saturday, May 15, 2010

INDIC LANGUAGE PDF GENERATION - JAVA

3:42:00 PM Posted by Satish , , 5 comments

Recently I was working in a task to create PDF document using languages other than English. It was working quite well for international languages. But when it came to indic languages, it did not work properly. I tried with lots of fonts and it did not even work for Hindi. I posted a question to i-text and got to know that, the shaping for indic languages is not yet done and it is not going to be a week end effort to finish. Some Indian developer need to contribute source code for that. Then I started looking at other alternatives. In the mean while I used to bring up this to my friends. I worked two years at Analytica India Pvt. Ltd. There I used to work with a Ubuntu work station (I am a java developer and love to work on Ubuntu than Windows). And I used to export my .odt files to PDF using open office. One of my old colleague told me that he created a hindi .odt file and exported that to PDF and that worked perfectly fine for him. So I decided to spend some time in that.

While googling for OpenOffice SDK, I came across Mr. Raman's blog, who worked with CDAC to create indic language jasper report using OpenOffice. I saw some hope of light and after some discussions with Mr. Raman, I finally started working with OpenOffice SDK. 
I played around the API for two three days and finally I could able to generate PDFs with of the indian languages. Some languages like telegu, assamise, oriya, malayalam did not work, but some indian contributers are working towords that. Hope those missing languages will be available soon.

Next I will demonstrate the full idea how I used the OpenOffice SDK to create PDFs.

Environment set up:

1. Need to download OpenOffice Engine and install it to the computer.
2. Need to download the OpenOffice SDK. This SDK contains lot of examples for developer reference.

Notes:

1. I used some off the classes that Mr. Raman had already wrote for jasper report. I modified the classes according to my requirement.
2. I used five jars from OpenOffice. I shared my workspace(eclipse). But I did it with OpenOffice 2.4.0 and JDK 1.4. You better try with updated OpenOffice 3.x.x and JDK 6.

Work Flow:

1. I took the indic language scripts from some web sites and stored those to database table.
2. First I created the .odt stream and wrote the content there and later exported all that to .pdf.
3. My whole eclipse workspace is shared. You may need to modify to make that work.

Source Code:

You can also pull the source code from GitHub.